This page follows the real order: install → import a subscription → connect → config routing. Screenshots are official App Store previews. If the app language is not English, button positions stay the same; only the labels change. This site does not provide nodes or an installer.
About 25 minutesYou need an Apple ID + a subscription URLApp ID 932747118
Before you start
Missing one item and you cannot continue. Check this table before you scroll on.
Devices
iPhone or iPad; system version follows the App Store listing.
Apple ID
Able to sign in to the App Store and complete payment. If search finds nothing, check this account’s store region first.
Lock-screen passcode
The first time a VPN configuration is added, the system asks for a passcode / Face ID / Touch ID. No passcode and authorization will stall.
Subscription source
Nodes or a subscription URL come from your provider. Shadowrocket only imports and connects. It does not provide a network.
Do not bring
An IPA, a shared account, or a cracked copy. Those are outside this tutorial.
Finish the four chapters in order. Do not turn the switch on and then hunt for a subscription. After each chapter, tick the list below (it stays in this browser only).
Learn the UI first: what the four tabs do
Every later step lands on one of these four places. Understand them and you will not get lost.
Home: connection and nodesType: choose SubscribeAdd Server: type a nodeConfig: configuration filesSettings: system options
Tab
What you do here
Buttons this tutorial uses
Home
Select a node, flip the switch, change Global Routing, measure latency
+, Scan, Not Connected, SERVER, Connectivity Test
Config
Manage config files and rules; decide which traffic uses the proxy
Goal: the official icon is on the Home Screen, and you can recognize the Home page. At the end of this chapter the switch must still be off.
1.1
Open the store, not a download site
Open the system App Store and search for Shadowrocket. Or open the official listing: App Store · id932747118.
The name must be spelled Shadowrocket in full. One missing letter can be a different app.
If search finds nothing, or you see “not available in your region,” check this Apple ID’s store region first. Do not download an IPA.
Price follows the region. Before you tap Buy, read the currency and amount. This tutorial does not cover changing region.
Whether Family Sharing works follows your current store rules. This text assumes you buy with your own account for your own use.
Why the store only
The connection depends on an iOS VPN configuration. If the installer source is unknown, system permission, later updates, and account safety are all out of control.
Fig. 1-1 · The store listing must show this official icon
1.2
Match the icon so you do not buy a look-alike
The official icon only looks like this
A white rounded square; the rocket is a line outline, not solid 3D; the color runs from teal-blue into purple; a small tail flame sits at the bottom.
Not an orange tile, and not a photographic rocket.
The Bundle ID is com.liguangming.Shadowrocket; the store ID is 932747118.
If the icon does not match: leave. Do not continue to payment.
Fig. 1-2 · White tile + teal-purple line rocket
1.3
Buy, install, then match Home
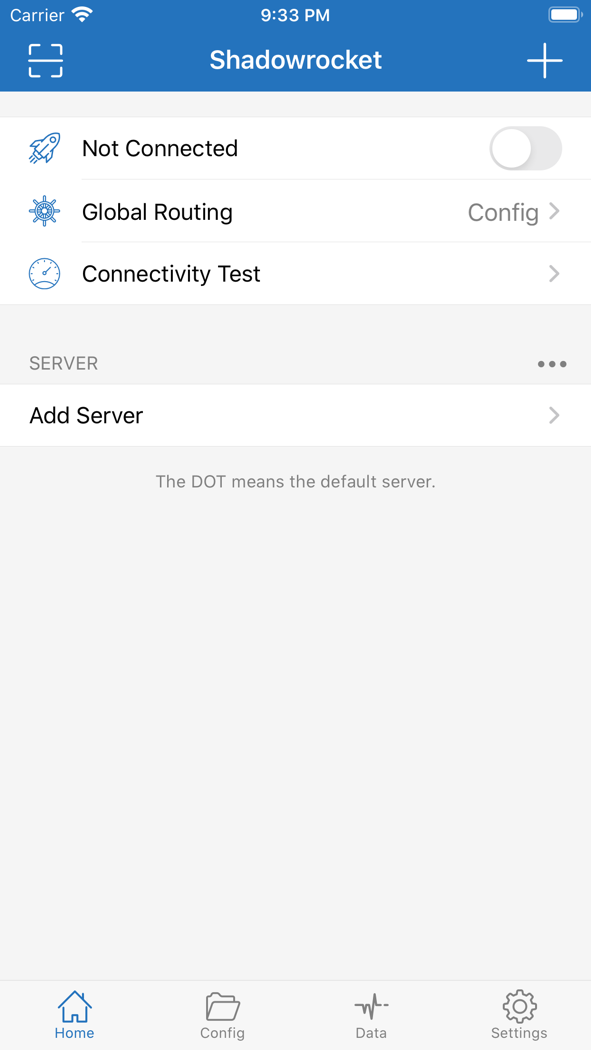
Tap Get or the price, and confirm with Face ID, Touch ID, or a passcode. When the Home Screen icon matches the image above, install is done. After you open it you should see this Home on the right:
The blue top bar says Shadowrocket; scan on the left, + on the right.
First row: rocket icon + Not Connected + a switch that is off.
Second row: Global Routing, usually Config on the right.
Third row: Connectivity Test. Do not tap it yet.
Under SERVER there is only Add Server. That is normal. No subscription has been imported yet.
Four tabs: Home (highlighted) / Config / Data / Settings.
Stop here
Flipping the switch with no nodes only pops the VPN prompt or fails at once. The next chapter adds the subscription first.
Fig. 1-3 · Fresh Home. Remember + and Not Connected first
Chapter 2 · Import a subscription
Goal: node names appear in the SERVER list on Home. If the provider gave a subscription URL, you must choose Subscribe in Type—not the default Shadowsocks.
2.1
On Home, tap “+” in the top bar, or scan
If the provider gave a QR code: tap the scan box on the left of the top bar. If it is an https URL: tap + on the right. Either path enters the add flow.
Leave the switch off.
Add Server under SERVER also opens the form, but the default type is often Shadowsocks, which subscription users fill in wrong more easily.
If an old subscription is already there, see clearly which row you are updating so you do not overwrite the wrong one.
Fig. 2-1 · Prefer the top-bar +. Do not turn the switch on first
2.2
Change Type to Subscribe
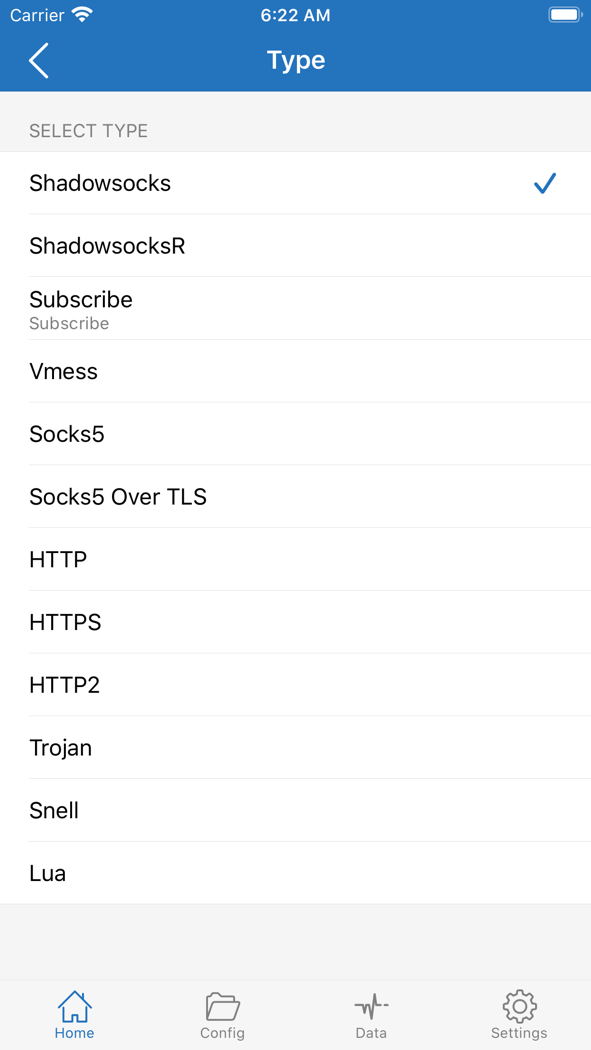
The first field on the add page is Type. Tap it and you see “SELECT TYPE.” In the official list, Subscribe sits under ShadowsocksR, with a small Subscribe label.
The default check is on Shadowsocks. Subscription users must change it.
Tap Subscribe, confirm the blue check on the right, then go back.
Vmess / Trojan / Socks5 / HTTP are only for a single node you type by hand.
What a wrong type does
Put a subscription URL in Shadowsocks Host and, after save, SERVER will not show a node group—or it errors immediately. This is the most common stuck point.
Fig. 2-2 · Find Subscribe and check it
2.3
Paste the URL; do not type it
Back on the form, paste the full subscription URL from the provider console. Missing https, dropping query parameters, or extra spaces will all fail the update.
Set Remark to a name you will recognize, such as the plan name or the expiry month.
If Update On Open is available, turn it on so nodes refresh when you enter the app later.
Top-bar Done becomes tappable only after required fields are complete. Then save.
Do not send the URL to a public chat. Cover the full address in screenshots.
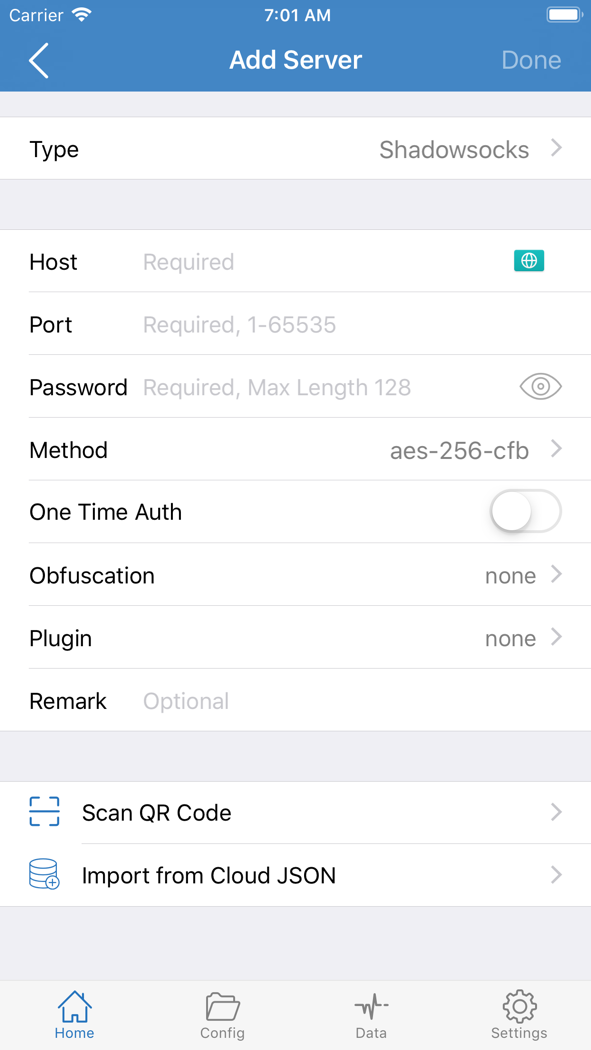
Use the Add Server form on the right only when the provider gave host, port, password, and method, and keep Type on the matching protocol.
Fig. 2-3 · This form is for a single node; subscriptions go through Subscribe
2.4
Return to Home and confirm SERVER is no longer empty
After a successful save, return to Home. The official empty list is only Add Server. After a successful import, a group of node names should appear under SERVER.
Nothing appeared: copy the URL from the provider again and check that Type is Subscribe.
A row appeared but the count is 0: the subscription expired or traffic ran out. Ask the provider first, then change the app.
You can tap Connectivity Test for latency. Do not make an odd number the default node yet.
Do not keep several expired subscriptions at once. Updates then make it hard to see which row refreshed.
Fig. 2-4 · After success, SERVER should have nodes—not only Add Server
Chapter 3 · Select a node and connect
Goal: the first row on Home becomes Connected, and VPN appears in the status bar. Do not reverse the order: select a node, then flip the switch, then allow system authorization.
3.1
Select a row under SERVER
Tap the node name; a dot appears on the left. Official hint: The DOT means the default server. The dotted row is the current exit.
Prefer a Connectivity Test result with lower latency that is not a timeout.
Switching to another row in the same subscription is enough. You do not have to delete the others.
Turn the switch on before selecting and the connect fails, or it hits an uncertain default.
Fig. 3-1 · Select a node first; leave the switch off
3.2
Flip the Not Connected switch on the first row
After the node has a dot, turn on the switch on the right of the first row. The label should become Connected (or the same word in your language).
The first time will interrupt you with a system VPN dialog. See 3.3.
Later opens usually do not prompt again. The switch should stay on.
If it turns on and springs back: check whether a node is selected, whether the subscription can update, and whether the system VPN was turned off.
Keep the second-row Global Routing on Config. Do not switch to Proxy just to “connect faster.”
Fig. 3-2 · First-row switch. Confirm the node has a dot before you turn it on
3.3
Allow “Add VPN Configuration”
iOS shows a system dialog, roughly that Shadowrocket wants to add a VPN configuration. This is a system permission, not an ad.
Tap Allow.
Enter the lock-screen passcode, or confirm with Face ID / Touch ID. No passcode and this fails.
If you tapped Don’t Allow, the Home switch will not work. Find Shadowrocket under Settings → VPN and turn it on again.
On a company device, MDM may block VPN and this will keep failing until an admin allows it.
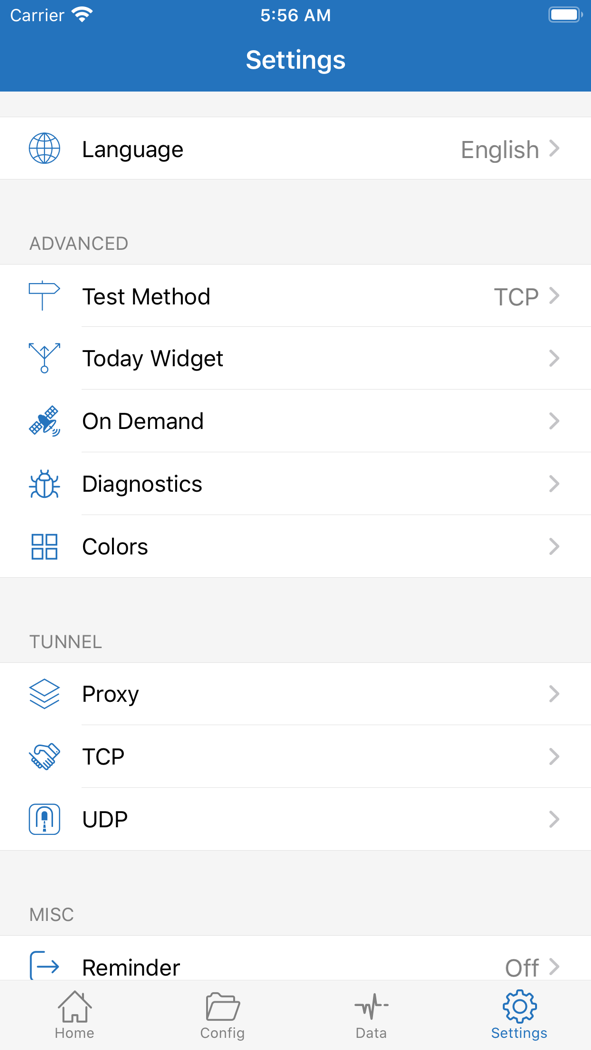
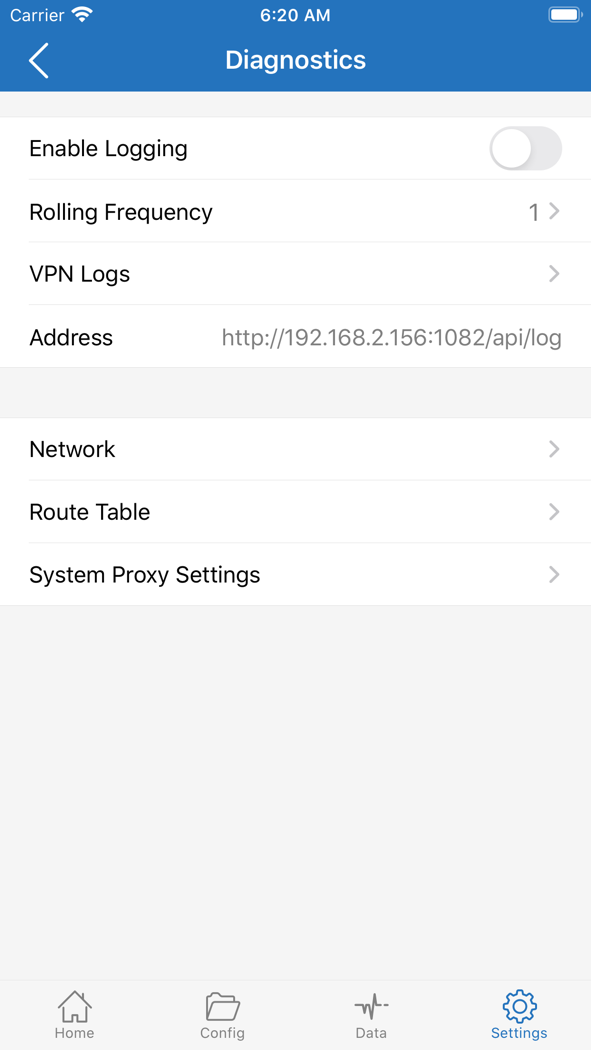
If authorization looks wrong, open logs in Settings → Diagnostics and see whether the VPN configuration was actually written.
Fig. 3-3 · Settings → Diagnostics; look here when authorization fails
3.4
After you connect, confirm three things
The first row on Home is Connected, and the selected SERVER node still has a dot.
VPN appears in the status bar at the top. No mark means you are not connected.
Open a site that clearly needs the proxy and confirm it loads.
Switch on but pages fail: change the node, or go back to chapter 2 and update the subscription. No VPN in the status bar: do not change the node; check system permission. On Demand in Settings, if left on by mistake, can also disconnect after sleep.
Fig. 3-4 · If it will not connect, check On Demand / Diagnostics in Settings
Chapter 4 · Config and routing
Goal: daily use is rule mode, not a global proxy. The subscription answers “which nodes exist.” Config answers “which traffic uses a node.”
4.1
Switch the tab to Config and open Config Files
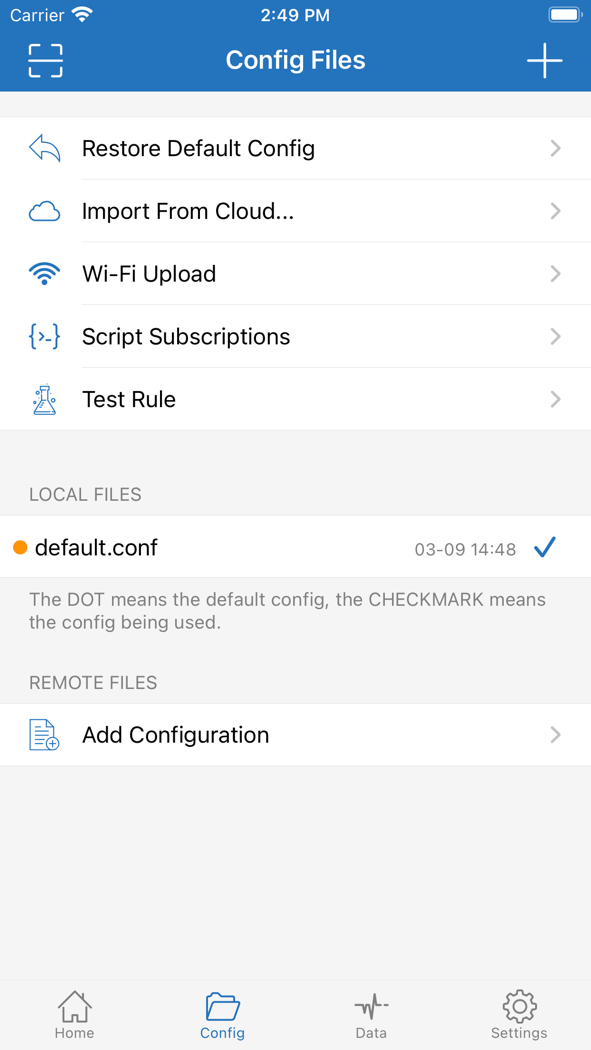
This page owns configuration files. The official screenshot shows:
Restore Default Config: restore the default after you mess it up.
Import From Cloud / Wi-Fi Upload: import a file from cloud storage or the local network.
LOCAL FILES: files on this device. Orange dot = default config; blue check = in use.
REMOTE FILES · Add Configuration: add a config URL from the provider.
Official note: The DOT means the default config, the CHECKMARK means the config being used. Only one file should be checked at a time.
Fig. 4-1 · Check the config that is in use
4.2
Open default.conf and see whether rules exist
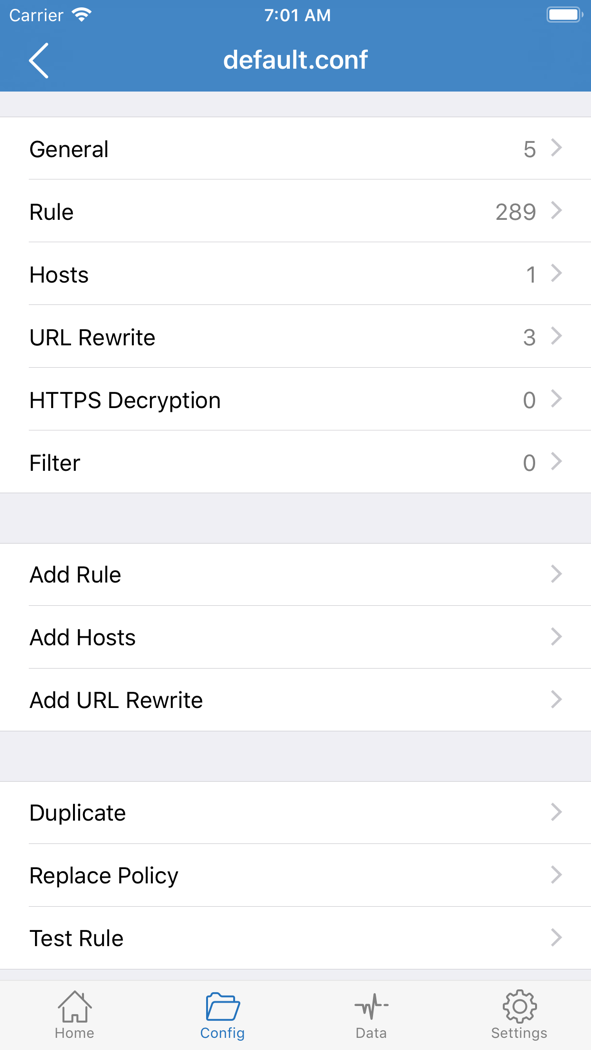
Tap default.conf under LOCAL FILES. In the official example Rule shows 289, which means the default already includes split routing. It is not an empty file.
If the provider also gave a config URL: add it under REMOTE FILES and check it. Do not copy rules into default.conf by hand.
Leave Add Rule / Test Rule until it already works, then edit individual domains.
If you mess it up, go back a page and tap Restore Default Config.
Fig. 4-2 · The Rule count shows whether routing is already present
4.3
Return to Home and keep Global Routing on Config
Tap Global Routing on the second row of Home. The three options mean:
Config
Decide direct or proxy from the current config file. Use this daily.
Proxy
Almost every request uses the current node. Only for a short diagnosis.
Direct
Everything goes direct, to compare “is the proxy itself the problem.”
Left on Proxy for long, local sites, system updates, and some apps get slower or fail more easily. After it connects and works, switch it back to Config.
Fig. 4-3 · The right side should show Config
4.4
Verify with two addresses before you edit rules
A site that should use the proxy (one you cannot open without it): it opens.
A site or app that should stay direct (banking, maps, the App Store): speed is normal, and it was not sent to a node by mistake.
If a proxied site fails, set Global Routing to Proxy once as a test:
Global works, rules do not: update the remote config, or Restore Default Config.
Global also fails: return to chapter 3, check the node and the system VPN. Do not keep adding rules in Config.
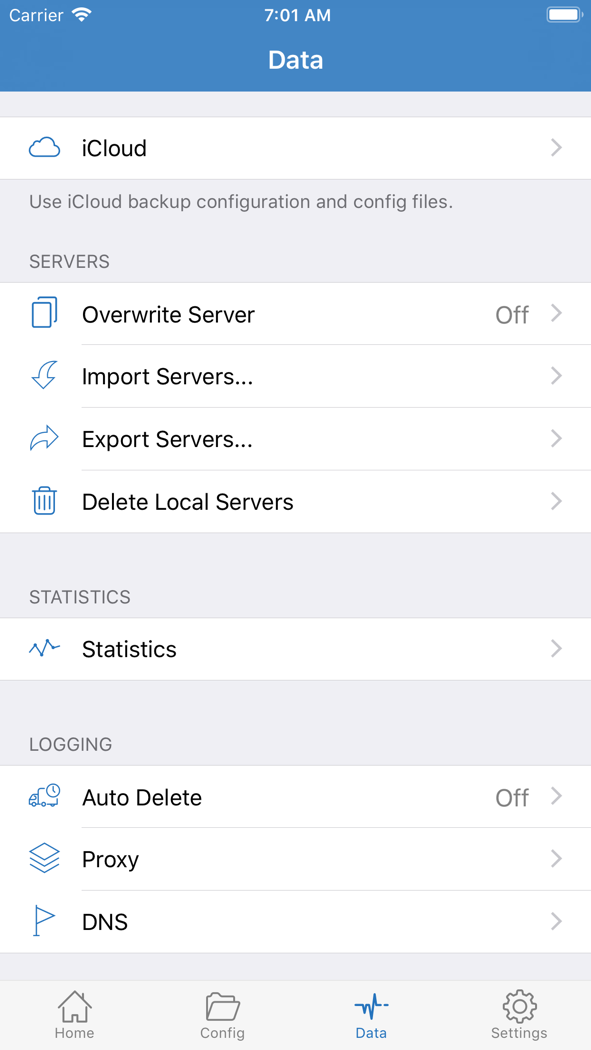
The Data page can back up to iCloud and import/export nodes; On Demand in Settings can connect on chosen networks. Neither page is required on the first pass.
Fig. 4-4 · Data is for backup and export, not the main routing entry
Troubleshooting table
Match the symptom, then change a setting. Do not edit the subscription, the node, and the rules at the same time.
What you see
Check first
What to do
Not in the store / region unavailable
Apple ID store region
Confirm the account region, then open id932747118. Do not download an IPA.
SERVER shows only Add Server
Whether a subscription was saved, and whether Type is Subscribe
Walk chapter 2 again. Copy the subscription URL from the provider once more.
After save, the node count is 0
Whether the subscription expired, and whether the URL is complete
Ask the provider first, then change the app.
The switch turns on and springs back
Whether a node is selected, and whether the system VPN is enabled
Select a row under SERVER first; check VPN in Settings.
The switch is on; the status bar has no VPN
System permission
Allow Shadowrocket again under Settings → VPN. Do not only change the node.
VPN is up; pages still will not open
Current node, subscription update
Change a row after Connectivity Test; or update the subscription.
Global works; rules do not
The Config file
Update the remote config, or Restore Default Config.
It disconnects after sleep
Settings → On Demand
See whether Disconnect on Sleep is on.
FAQ
No. Get it from the App Store only, so updates and VPN permission share one source.
Subscribe manages a group of nodes with one URL, which fits a provider subscription. Add Server is a single Host / Port / password typed by hand. A subscription URL sent through Add Server is the most common failure.
Not as the daily default. Keep Global Routing on Config on Home. Use Proxy only to ask “is the node broken, or are the rules broken.”
That depends on whether you used iCloud / export in Data. Safer: keep the subscription URL and the config URL, import them again after reinstall, and allow the VPN again.
Find them by place: left to right the tab bar is still Home / Config / Data / Settings; the top-right control is still add; the first row is still the connection switch. Settings → Language can switch the UI to English so you can follow this tutorial.